Run the following database script to check all the advanced configuration options
EXEC sp_configure 'Show Advanced Options', 1;
GO
RECONFIGURE;
GO
EXEC sp_configure;
Friday, July 30, 2010
Thursday, July 29, 2010
Javascript: How to Find the enclosing/parent FORM Element
I was working on a project and came across a situation where we have more than one forms being generated dynamically in one page. And each form contains lots of input fields. To identify the enclosing/parent form element on some action of input tags, I used the following code:
Put these two javascript functions in script tag under head section of your page:
Here is the example to call this code:
Put these two javascript functions in script tag under head section of your page:
 function findParentForm(elem){
   var parent = elem.parentNode;
   if(parent  && parent.tagName != 'FORM'){
    parent = findParentForm(parent);
   }
   return parent;
   }

  function getParentForm( elem )
  {
     var parentForm = findParentForm(elem);
     if(parentForm){
    alert("Form found: ID = " + parentForm.id + " & Name = " +parentForm.name);
     }else{
    alert("unable to locate parent Form");
     }

  }
Here is the example to call this code:
<body>
  <h3>  Form 1 </h3>
 <form name ="formName1"  id ="formId1">
   <span>
    <div>
   <input type ="button" name ="button1" value="button1" onclick="javascript:getParentForm(this);"/> <br/>
    </div>
   </span>

 </form>
 <hr/>
 <h3>  Form 2 </h3>
 <form  name ="FormName2" id ="formId2">
 <span>
  <div id ="asda" name ="divName">
 <input type ="button" name ="button1" value="button2" onclick="javascript:getParentForm(this);"/> <br/>
  </div>
  </span>
 </form>
</body>
Friday, July 23, 2010
Oracle: Generate SQL script to drop all tables of any database
In oracle there is no option to drop all the user tables, but you can achieve this by generating a scrip and run that script.
To generate a script for dropping all the user tables, simply run this query and then run the result/output of this query.
SELECT 'DROP TABLE '||table_name|| ' CASCADE CONSTRAINTS;'
FROM user_tables;
To generate a script for dropping all the user tables, simply run this query and then run the result/output of this query.
SELECT 'DROP TABLE '||table_name|| ' CASCADE CONSTRAINTS;'
FROM user_tables;
Wednesday, July 21, 2010
Eclipse getting Out of Memory
I installed latest version of JDK 1.6.21 and latest eclipse Halilos version to Windows 7 (32bit). Eclipse started crashing again and again after few minutes, giving me the out of Memory issue in logs.


Here is the exception log:
!ENTRY org.eclipse.ui 4 0 2010-07-21 09:08:30.662
!MESSAGE Unhandled event loop exception
!STACK 0
java.lang.OutOfMemoryError: PermGen space
at java.lang.ClassLoader.defineClass1(Native Method)
at java.lang.ClassLoader.defineClassCond(ClassLoader.java:632)
at java.lang.ClassLoader.defineClass(ClassLoader.java:616)
at org.eclipse.osgi.internal.baseadaptor.DefaultClassLoader.defineClass(DefaultClassLoader.java:165)
at org.eclipse.osgi.baseadaptor.loader.ClasspathManager.defineClass(ClasspathManager.java:554)
at org.eclipse.osgi.baseadaptor.loader.ClasspathManager.findClassImpl(ClasspathManager.java:524)
at org.eclipse.osgi.baseadaptor.loader.ClasspathManager.findLocalClassImpl(ClasspathManager.java:455)
at org.eclipse.osgi.baseadaptor.loader.ClasspathManager.findLocalClass_LockClassLoader(ClasspathManager.java:443)
at org.eclipse.osgi.baseadaptor.loader.ClasspathManager.findLocalClass(ClasspathManager.java:423)
at org.eclipse.osgi.internal.baseadaptor.DefaultClassLoader.findLocalClass(DefaultClassLoader.java:193)
at org.eclipse.osgi.framework.internal.core.BundleLoader.findLocalClass(BundleLoader.java:370)
at org.eclipse.osgi.framework.internal.core.BundleLoader.findClassInternal(BundleLoader.java:446)
at org.eclipse.osgi.framework.internal.core.BundleLoader.findClass(BundleLoader.java:399)
at org.eclipse.osgi.framework.internal.core.BundleLoader.findClass(BundleLoader.java:387)
at org.eclipse.osgi.internal.baseadaptor.DefaultClassLoader.loadClass(DefaultClassLoader.java:87)
at java.lang.ClassLoader.loadClass(ClassLoader.java:248)
at org.eclipse.wst.sse.ui.StructuredTextEditor.createActions(StructuredTextEditor.java:1277)
at org.eclipse.ui.texteditor.AbstractTextEditor.createPartControl(AbstractTextEditor.java:3362)
at org.eclipse.ui.texteditor.StatusTextEditor.createPartControl(StatusTextEditor.java:53)
at org.eclipse.ui.texteditor.AbstractDecoratedTextEditor.createPartControl(AbstractDecoratedTextEditor.java:394)
at org.eclipse.wst.sse.ui.StructuredTextEditor.createPartControl(StructuredTextEditor.java:1362)
at org.eclipse.ui.part.MultiPageEditorPart.addPage(MultiPageEditorPart.java:217)
at org.eclipse.ui.part.MultiPageEditorPart.addPage(MultiPageEditorPart.java:187)
at org.eclipse.wst.xml.ui.internal.tabletree.XMLMultiPageEditorPart.addSourcePage(XMLMultiPageEditorPart.java:435)
at org.eclipse.wst.xml.ui.internal.tabletree.XMLMultiPageEditorPart.createPages(XMLMultiPageEditorPart.java:605)
at org.eclipse.ui.part.MultiPageEditorPart.createPartControl(MultiPageEditorPart.java:310)
at org.eclipse.ui.internal.EditorReference.createPartHelper(EditorReference.java:661)
at org.eclipse.ui.internal.EditorReference.createPart(EditorReference.java:428)
at org.eclipse.ui.internal.WorkbenchPartReference.getPart(WorkbenchPartReference.java:594)
at org.eclipse.ui.internal.PartPane.setVisible(PartPane.java:306)
at org.eclipse.ui.internal.presentations.PresentablePart.setVisible(PresentablePart.java:180)
at org.eclipse.ui.internal.presentations.util.PresentablePartFolder.select(PresentablePartFolder.java:270)
Solution:
After struggling with this, I found this issue is due to the latest JDK v1.6.21. Best is to use the stable version of JDK that is: JDK v 1.6.20 and configure it accordingly.
Hopefully it will resolve the issue, if still getting the issue add following line after "-vmargs" to your eclipse.ini file:
-XX:MaxPermSize=256m
The eclipse.ini file can be found under eclipse directory. It will be someting like this:
eclipse.ini
---------------
-showsplash
org.eclipse.platform
--launcher.XXMaxPermSize
512M
-framework
plugins\org.eclipse.osgi_3.4.3.R34x_v20081215-1030.jar
-vm
C:\Program Files\Java\jdk1.5.0_22\bin
-vmargs
-XX:MaxPermSize=512m
-Dosgi.requiredJavaVersion=1.5
-Xms128m
-Xmx1024m
---------------
Wednesday, July 14, 2010
Java Web Service: Developing SOAP Based Web Service via Apache Axis2
Introduction:
Web service is a distribution software/application component that communicates using open protocols is self contained, self describing and can be discovered by UDDI (Universal Description, Discovery and Integration). Web Services can be used by other applications, or you can say other applications consume the web services. XML is the basis of the web services. XML is a language used to communicate between the different languages. Web Services are language independent and platform independent because all the vendors are agreed to use the common protocols and common way of communication using XML.
There are two main models for web services development in Java, REST based web services and SOAP/WSDL based web services.
REST based Web Services:- REST (REpresentational State Transfer) are resources in which every process is modeled as a unique URI. The protocol used in REST based web services is HTTP. These are not as secure, as flexible, as SOAP based web services. And only supports HTTP protocol.
SOAP/WSDL based Web Services:- SOAP/WSDL-based web services uses Java utilities create a WSDL file based on the Java code in the web service. The WSDL is exposed on the net. Parties interested in using the web service create a Java client based on the WSDL. Messages are exchanged in SOAP format. The range of operations that can be passed in SOAP is much broader than what is available in REST, especially in security. SOAP-based web services are suitable for heavyweight applications using complicated operations and for applications requiring sophisticated security, reliability or other standards-supported features. They are also suitable when a transport protocol other than HTTP has to be used.
Apache Axis2 is an open-source implementation of the SOAP (Simple Object-Access Protocol) submission to the W3C. Axis2 not only supports SOAP 1.1 and SOAP 1.2, but it also has integrated support for RESTful web services.
We are going to develop a simple web service using Apache Axis2 using eclipse and Tomcat 6 as server.
Setting up the Environment:


 Now tick the check boxes named as “Axis2 Web Services” and select OK.
 After this you will be back on the New Dynamic Web Project. Click Finish. A new project will be created.


Click Next and you will be on the following screen. And make sure you Server rumtine is Tomcat v6.0 Server and Web Service Runtime should be Apache Axis2, if not you can configure these by clicking on the hyperlinks. For example to configure Web Service Runtime, click on the hyperlink highlighted as following.
 And it will open a new screen to configure Apache Axis 2 runtime for you. Select Apache Axis2 from the list and click ok.
 You will be back on Web Service Screen, click Next.

Again click Next.

Now Click Start Server button.

 Choose the server and click Finish.
 You will see the following page in your integrated browser of eclipse.
 Click on the services link encircled above and you can see your calculator service as following.


The next step is to create a Web Service Client to test this web service.
 Click Next.
 Paste the WSDL path in the service definition box and make sure you have the correct configurations as displayed in above snapshot. And click Next.


Web service is a distribution software/application component that communicates using open protocols is self contained, self describing and can be discovered by UDDI (Universal Description, Discovery and Integration). Web Services can be used by other applications, or you can say other applications consume the web services. XML is the basis of the web services. XML is a language used to communicate between the different languages. Web Services are language independent and platform independent because all the vendors are agreed to use the common protocols and common way of communication using XML.
There are two main models for web services development in Java, REST based web services and SOAP/WSDL based web services.
REST based Web Services:- REST (REpresentational State Transfer) are resources in which every process is modeled as a unique URI. The protocol used in REST based web services is HTTP. These are not as secure, as flexible, as SOAP based web services. And only supports HTTP protocol.
SOAP/WSDL based Web Services:- SOAP/WSDL-based web services uses Java utilities create a WSDL file based on the Java code in the web service. The WSDL is exposed on the net. Parties interested in using the web service create a Java client based on the WSDL. Messages are exchanged in SOAP format. The range of operations that can be passed in SOAP is much broader than what is available in REST, especially in security. SOAP-based web services are suitable for heavyweight applications using complicated operations and for applications requiring sophisticated security, reliability or other standards-supported features. They are also suitable when a transport protocol other than HTTP has to be used.
Apache Axis2 is an open-source implementation of the SOAP (Simple Object-Access Protocol) submission to the W3C. Axis2 not only supports SOAP 1.1 and SOAP 1.2, but it also has integrated support for RESTful web services.
We are going to develop a simple web service using Apache Axis2 using eclipse and Tomcat 6 as server.
Setting up the Environment:
- Get Eclipse latest version from http://www.eclipse.org/downloads/
- Download and install Tomcat 6.0 from the following location: http://tomcat.apache.org/download-60.cgi
- Install Tomcat Plug-in for eclipse. Check the following post to get and configure the plugin: http://sabahmyrsh.blogspot.com/2010/07/sysdeo-eclipse-tomcat-launcher-plugin.html
- Get the latest Apache Axis2 from the following location: http://ws.apache.org/axis2/download.cgi
Step 1:
First step is to configure the Axis2 with tomcat. To accomplish this unzip/extract the downloaded Axis version at any location of your hard drive. I am using this path for this example: C:\axis2\axis2-1.5
First step is to configure the Axis2 with tomcat. To accomplish this unzip/extract the downloaded Axis version at any location of your hard drive. I am using this path for this example: C:\axis2\axis2-1.5
Then Open Eclipse and open:
Window -> Preferences -> Web Services -> Axis2 Preferences
Window -> Preferences -> Web Services -> Axis2 Preferences

Select the Axis2 Runtime tab and point to the correct Axis2 runtime location and click Apply and then Ok.
Step 2:
Now we need to create a project with the support of Axis2 features. Open File -> New -> Other... -> Web -> Dynamic Web Project

Click Next and provide project name as CalculatorWebService (you can use any name). Please select the following configurations:
• “Apache Tomcat v6.0” as Select Target runtime.
• “2.5” as Dynamic web module version
• For Configuration, Press the Modify button.
 Now tick the check boxes named as “Axis2 Web Services” and select OK.
 After this you will be back on the New Dynamic Web Project. Click Finish. A new project will be created.
Step 3:
Now add a new package (myservices) and a plain Java class (Calculator). This Calculator class will contain methods that we will expose as web service. The methods we want to expose as web service must have public access.


Step 4:
Now Select Calculator.java, open File -> New -> Other... -> Web Services -> Web Service

Click Next and you will be on the following screen. And make sure you Server rumtine is Tomcat v6.0 Server and Web Service Runtime should be Apache Axis2, if not you can configure these by clicking on the hyperlinks. For example to configure Web Service Runtime, click on the hyperlink highlighted as following.
 And it will open a new screen to configure Apache Axis 2 runtime for you. Select Apache Axis2 from the list and click ok.
 You will be back on Web Service Screen, click Next.
Again click Next.


Now Click Finish. Your web service is created for your Calculator class and it is published to your Tomcat Server.
Step 5:
Right Click on the web service project and run as server.
 Choose the server and click Finish.
 You will see the following page in your integrated browser of eclipse.
 Click on the services link encircled above and you can see your calculator service as following.
If you click on the Calculator link encircled above, you can see the WSDL generated by your web service. This WSDL you will use to create a wb service client. Please copy the link of WSDL:

The next step is to create a Web Service Client to test this web service.
Create a Web Service Client:
To create a web service client and test the web service, we will create a new project and will test this web service. Open File -> New -> Other... -> Web Services -> Web ServiceClient
 Click Next.
 Paste the WSDL path in the service definition box and make sure you have the correct configurations as displayed in above snapshot. And click Next.
Now leave the default configurations on this screen and click Finish. I will generate a new project that will contain the Stub class that we can use to call the methods of web service.
Add a new class in the client project to test the web service methods like shown in the following snapshot.

package myservices;import java.rmi.RemoteException;import org.apache.axis2.AxisFault;public class CalculatorTestClient {/*** @param args* @throws RemoteException*/public static void main(String[] args) throws RemoteException {//Step 1: create an object of Stub class that is generated.CalculatorStub stub = new CalculatorStub();//Step 2: Web Service Client has created inner classes in CalculatorStub for each of the web service method.// We need to create the object of these classes to utilize the web service method.CalculatorStub.Add add = new CalculatorStub.Add();// Step 3: set the values for parameters for the web service method to calladd.setA(45.67);add.setB(12.34);// Step 4: Now call the web service method using the stub object and assign it to specific response variable.CalculatorStub.AddResponse resp = stub.add(add);// Step 5: Finally call the get_return method to retrieve the final result from response object.System.out.println(" Result for 45.78 + 12.34 = "+resp.get_return());}// end main} // end class
Now finally, run this client as plain java program. Right Click inside the Java class-->Run as-->Java Application. You can see the results on the console.


NOTE:
You can also use Netbeans to create SOAP based Apache Axis2 Web Services. For this please visit the following tutorial.
Thursday, July 8, 2010
Installation of Subclipse and Connecting to Repository
Installation of Subclipse:
This blog will describe the installation of Subclipse directly through Eclipse. Please note, for safety purposes, a separate instance of eclipse should be installed prior to installation of the repository.


This blog will describe the installation of Subclipse directly through Eclipse. Please note, for safety purposes, a separate instance of eclipse should be installed prior to installation of the repository.
At the writing of this document, I am using Galileo release of Eclipse (Version 3.5.2).
Step 1
Goto Help menu, and select Install New Software...
Goto Help menu, and select Install New Software...

Step 2
Add the site where Subclipse can be downloaded from.

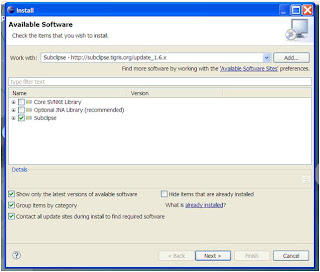
Step 3
Select the checkbox that is next to the Subclipse name. This will install all items required for Subclipse, and an additional merge utility.

Step 4
Review the install details, and click next. Then accept the license agreement presented after reviewing the install details.


Step 5
Once completed, and you hit next, the download of the plugin will occur.

Conclusion: Restart Eclipse...

Connecting to Repository:
Next step is to download the repository of your projects source. Unlike CVS, SVN represents branches and tags as files in the folder structure. We want to be careful not to check out the entire repository. If the entire repository is checked out, a representation of every tag and branch ever made for the application will be downloaded as a local copy to the hard drive. This could consume a lot of disk space very carefully.
Create a new project in Eclipse from the SVN repository. Select "Checkout Projects from SVN." Then click next.

If you do not have any repository yet, select "Create a new repository location" then click next.

And provide the SVN repository path and click Next and then Finish.

Select the appropriate project listed (Not Shown here) and click Next.
Create a new project to add to your workspace. Ensure "Check out HEAD revision_"_ and check out as a new project in your workspace, or use the New Project Wizard (not shown) to create a new project.

Use the default workspace, or one you already have defined.

The SVN Repository checkout will start right away.
Sysdeo Eclipse Tomcat Launcher plugin
Plugin features
Starting and stopping Tomcat 4.x, 5.x and 6.x
Registering Tomcat process to Eclipse debugger
Creating a WAR project (wizard can update server.xml file)
Adding Java Projects to Tomcat classpath
Setting Tomcat JVM parameters, classpath and bootclasspath
Exporting a Tomcat project to a WAR File
Capability to use a custom Tomcat classloader to load classes in several java projects at the same classloader level than classes in a Tomcat project, see readmeDevLoader.html (Thanks Martin Kahr)
Download Link:
Subscribe to:
Posts (Atom)